
Tweaking enables users to optimize and repair their Windows operating system using various tools and utilities. This software’s capacity to back up and restore the Windows registry is one of its primary and most valuable capabilities.
Information about system preferences, configuration, and installed programs are kept in the Windows registry, a centralized database stored on your PC.
System stability or performance problems might arise due to the Registry becoming clogged up with junk or corrupted over time. Tweaking allows users to restore their system to an earlier state if the Registry is corrupted or data is lost by creating a registry backup.
Features
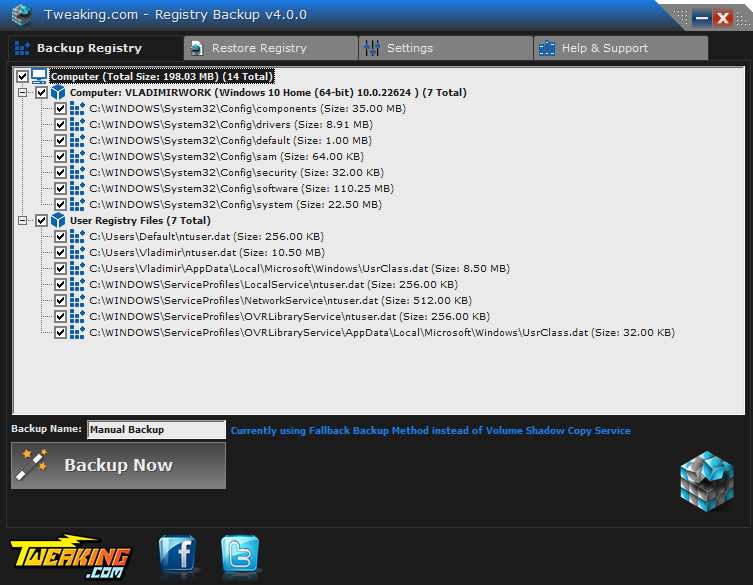
Complete Registry Backup
Tweaking lets users back up their Windows registry containing all configuration and setting information. If the system is corrupted or data is lost, this backup can be utilized to return the Registry to its original condition.
Users can create a complete backup of their Windows registry using the Tweaking software’s Full Registry Backup option. This feature may be helpful when the Registry is corrupted or damaged, and system instability or errors result. In addition, users can avoid potential data loss or system crashes by restoring their system to a previous operating condition with a complete registry backup.
Users must open the Tweaking software and select the Registry Backup option to use this feature. They can then choose the Complete Registry Backup option and choose where to save the backup file. The software will then give a full Windows registry backup, including all keys, values, and settings. Users can also set up automatic backups to guarantee their system is always secure.
Incremental Backup
Users can create backups of their Windows registry by only preserving changes that have occurred since the last backup using the Incremental Backup option of the Tweaking software. As it just backs up the changes made to the Registry rather than the entire Registry, this function can be helpful for users who want to reduce the amount of disk space and time used while performing backups.
Users must open the Tweaking software and select the Registry Backup option to use this feature. Next, users can choose Incremental Backup and decide where to save the backup file. The software will then examine the Registry for alterations since the last backup. Then it will generate a backup file that solely contains those modifications.
Those who constantly update their drivers, install or remove applications, change system settings, or otherwise alter their system will find the Tweaking software’s Incremental Backup option of particular benefit. They don’t have to regularly back up the entire Registry because they can use this functionality to produce backups that include all the modifications made to the register.
Backup Scheduling
Users can schedule automatic backups of their Windows registry using the backup scheduling option in the Tweaking software. Those who wish to ensure their system is frequently backed up without actively starting the backup process may find this feature beneficial.
Users must open the Tweaking software and select the Registry Backup option to use this feature. They can then choose the Scheduled Backup option and define the backup’s frequency and timing. For example, customers can schedule backups for daily, weekly, or monthly intervals at a specific time.
The Tweaking will automatically create backups of the Windows registry at predetermined intervals once the backup plan is set up. Users may also set up notifications to notify them when the backup process is complete and designate the place where the backup files should be kept.
The Tweaking backup schedule feature is beneficial for customers who want to ensure that their system is frequently backed up without having to remember to start the backup process manually.
In addition, users can confirm they always have a recent system backup by scheduling backups, making it simpler to restore their approach to a previous condition if necessary.
Registry Restore
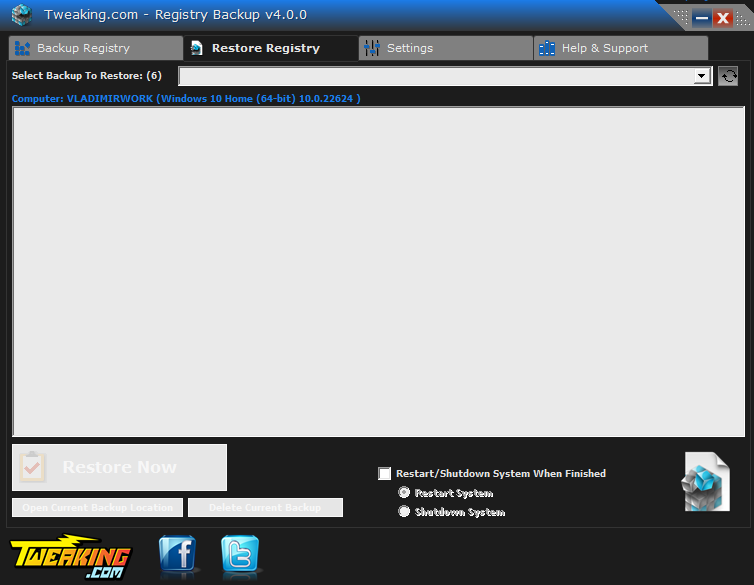
Users can restore their Windows registry to a previous backup state using the Tweaking software’s Restore Registry feature. This feature may be helpful when the Registry is corrupted or damaged, and system instability or errors result.
Users must open the Tweaking software and select the Registry Backup option to use this feature. They can then pick the backup file they want to restore from and choose the Restore Registry option. The software will then ask the user for confirmation before restoring the Windows registry to the state it was in when the desired backup file was selected.
This way, you can restore certain sections of the Windows registry rather than the full register using the Tweaking software’s Restore Registry option. Users can decide, for instance, to restore some keys or values in place of the entire Registry.
Automatic Backup Creation

Users can use the Tweaking software’s Automatic Backup Creation option to create backups of their Windows registry at predetermined intervals automatically. Those who wish to ensure that their system is frequently backed up without having to start the backup process actively may find this feature beneficial.
Users must open the Tweaking software and select the Registry Backup option to use this feature. They can then choose the “Automatic Backup Creation” option and define the backup’s frequency and schedule. Customers can specify the time of day at which the backup should be created and whether they want to create backups daily, weekly, or monthly.
The Tweaking software will automatically create backups of the Windows registry at predetermined intervals once the automated backup creation plan is set up. Users may also set up notifications to notify them when the backup process is complete and designate the place where the backup files should be kept.
The Tweaking automatic backup creation option is beneficial for customers who want to ensure that their system is frequently backed up without having to remember to start the backup process manually.
In addition, users can confirm they always have a recent system backup by automating the backup process, making it simpler to restore their approach to a previous condition if necessary.
How can you use the program?
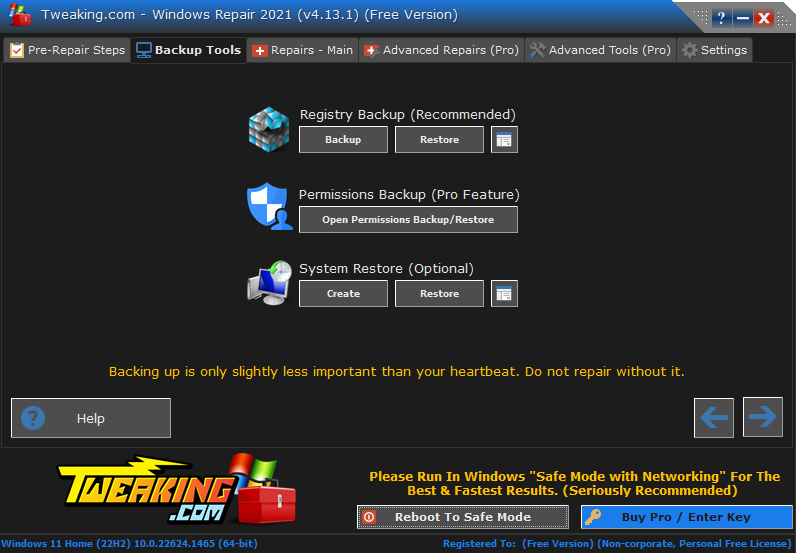
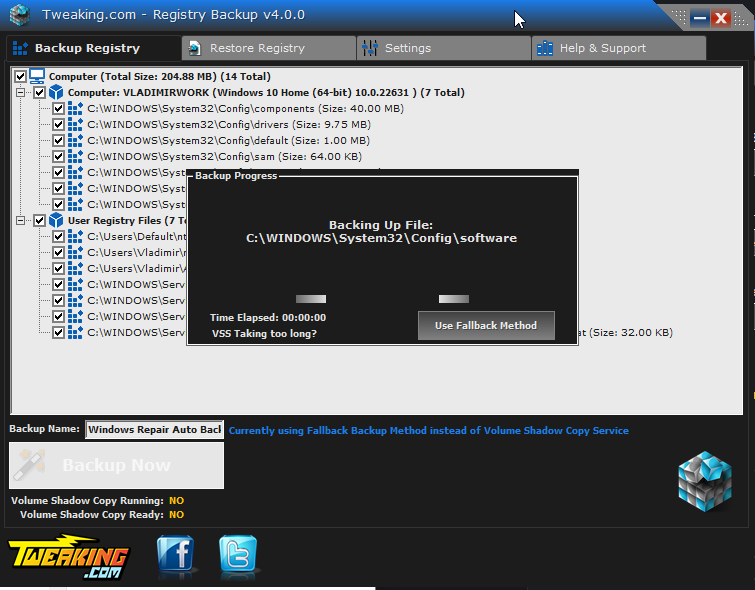
Backing up the Windows Registry is as easy as one click:
- Open Tweaking.com by double-clicking the executable.
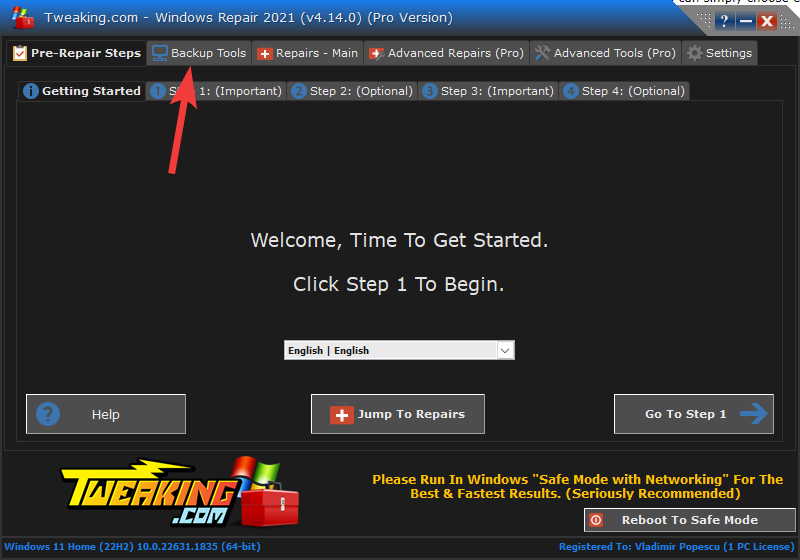
- Click the Backup Tools tab from the top of the software.
- Choose the Backup option, and wait for the process to complete.
What versions of Windows does the program support?
The program supports any version of Windows with the volume shadow copy service—currently, Windows XP, 2003, Vista, 2008, 7 & 8.
If you have Windows 2000 or older, I recommend my old favorite software, ERUNT.
Can the program automatically back up the Registry?
Yes. The program uses the Windows task scheduler to back up the Registry automatically. By default, the program makes the schedule set to run at user logon. However, using the Windows task scheduler, you have complete control of how and when the backup will run. When the program is run with the /silent command, it will back up and close.
What settings does the software have to offer?
The Tweaking Repair program offers the following setting:
- Change Backup Location – The default backup location is in the same folder as the program and can be found in the Backups folder. When you install it, this setting is enabled by default and sets the backup folder to C:/RegBackup (or whichever drive Windows is installed on)
- Auto Delete Old Backups – This is enabled by default and set to 30 days. This option will auto-delete old backups from the backup location and for the current system only. It will not delete old backups for other systems. (Example: You run the program from a thumb drive or network location for multiple systems). The auto-delete function only runs when creating a new backup.
- Scheduling Options – This option is disabled by default. If the current system has any locked profiles, the schedule runs under the System account to backup those locked registry files because, usually, the System account has access to those files. If there are no locked profiles on the system, running under the current user account is recommended.
What advantages do Tweaking Repair have compared to ERUNT?
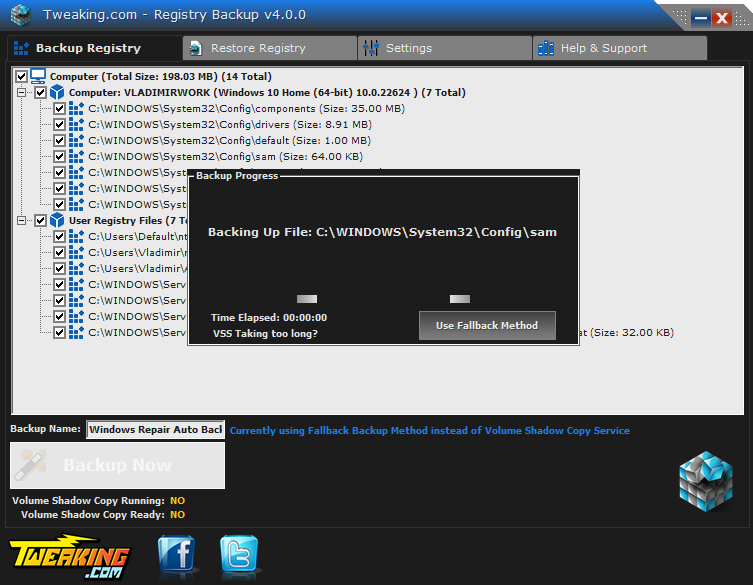
Note: As of v1.2.0, the program will use the API backup method if the volume shadow copy service fails.
ERUNT is one of my favorite registry backup programs. But it hasn’t been updated since 2005 and lacked some options I wanted.
Many registry backup programs use the RegSaveKey API, such as ERUNT. When using the API, you can only back up loaded registry files. This means if multiple user profiles are not logged in, they do not get backed up.
Tweaking.com’s Registry Backup feature uses the Volume Shadow Copy Service instead. This allows perfect backups of the registry files and all profiles on the system.
Microsoft recommends using the Volume Shadow Copy to backup up the Registry, as this process grabs a complete backup of the registry hives precisely as they are.
This is what Microsoft had to say on this topic:
Applications that back up or restore system state, including system files and registry hives, should use the Volume Shadow Copy Service instead of the registry functions.Using RegSaveKey with RegRestoreKey to copy subtrees in the registry is not recommended. This method does not trigger notifications and can invalidate handles used by other applications.
Using the Volume Shadow Copy instead of the RegSaveKey API provides an overall safer experience and excellent results.
ERUNT can not restore other profile registry files if they are not loaded during the backup process. Tweaking.com – Registry backup saves and restores them all without any issues.
ERUNT creates a batch file to run from the Windows recovery console (in case Windows can’t boot). This works in Windows XP but not in Vista & newer OS versions.
The batch file has the C/: drive hard coded and can only replace the system registry and not any of the profiles. In Windows Vista & newer recovery consoles, sometimes C/: isn’t mapped to the Windows drive; thus, the restore fails.
Tweaking.com – Registry Backup takes this into account and finds the drive the Registry was saved from using a locator or marker file.
Example: tweaking.com-regbackup-DELL-P370-Microsoft-Windows-7-Professional-(64-bit).dat, which is stored in the Windows folder of the drive during the backup process.
What restore options does the program have?
The primary restore is built into the program, requires a single click, and can be run in Windows Safe Mode. The program also creates a batch file called dos_restore.cmd with each backup. It is stored in the same folder the backup is stored in. It should be used from the Recovery Console if Windows won’t boot.
The program stores the backup with the full folder path of the registry files, exactly as they are stored on the Windows boot drive. So if you don’t have the Recovery Console, you can use any Live CD like Ubuntu or Puppy to boot and browse the hard drive to the backup. Copy and paste the backup files to the root of the drive.
How do I restore from the XP recovery console?
The Windows XP recovery console is minimal (thankfully, Microsoft fixed this in Vista and newer). The XP recovery console, by default, blocks users from going to any non-system folders and has the Set command disabled.
Tweaking.com – Registry Backup will change the reg key when run on the system to allow the Set command. Once in the recovery console, the first thing you have to do is to run the following command:set AllowAllPaths = true
Once that is set, you can browse to your backup of choice and then run this command:batch dos_recovery.cmd
At this point, the restore will run and be very quick. Because of the limitation of the XP recovery console, you have to make sure that the Windows drive letter is the same as when you made the backup. Example: C/:
Restoring the Live CD is the best option if this doesn’t work for you.
How do I restore from the Repair Windows in Vista, 2008, 7 & 8?
Thankfully Microsoft made this recovery console much better, and thus is far simpler to restore if Windows won’t boot.
- Open the System Recovery Options and click Command Prompt.
- Browse to the backup of your choice, and run the following command:
run dos_restore.cmd - Restart your PC.
Does the program fail when trying to back up?
Check the troubleshooting section for more info. If it doesn’t have your answer, post in the forums, and our team will help you there.
I don’t have a CD drive; how can I use the Ubuntu Live CD?
Here are three examples of how to create easy-to-use bootable Live USB drives
1. Universal USB Installer – Easy to use and effective
The Universal USB Installer is a Live Linux USB Creator that allows you to choose from a selection of Linux Distributions to put on your USB Flash Drive. The Universal USB Installer is easy to use. Choose a Live Linux Distribution, the ISO file, and your Flash Drive, and, Click Install.
2. UNetbootin – Efficient for these tasks
UNetbootin allows you to create bootable Live USB drives for Ubuntu, Fedora, and other Linux distributions without burning a CD. It runs on Windows, Linux, and Mac OS X.
3. YUMI – Multiboot USB Creator for Windows
This software can create a Multiboot USB Flash Drive containing multiple operating systems, antivirus utilities, disc cloning, diagnostic tools, and more.
Tweaking.com – Registry Backup Troubleshooting
Backup failed, Volume Shadow Copy Failed
The program relies on the Volume Shadow Copy service to back up the registry files. Below is a list of fixes I have gathered to help repair the Volume Shadow Copy.
If the volume shadow copy service fails, it is best to try and fix it. But as of v1.2.0 of the program, if for any reason VSS fails, the program will use the old API backup method.
1. Use a volume shadow copy repair tool
You can use the powerful Windows Repair All-in-One tool from Tweaking to resolve this issue once and for all:
- Download the app and install it.
- Open the software and go through the step-by-step process.
- Make sure to run the WMI Repair tool to resolve any issues.
- After the process is completed, please reboot your PC.
Note: VSS breaks down on systems that haven’t been rebooted in a while. Rebooting your system regularly is essential as a maintenance and preventative step, as all Microsoft veterans know. Transient VSS errors will be fixed by rebooting if they cause VSS issues.
2. Fix the VSS error 8193 in Event Viewer
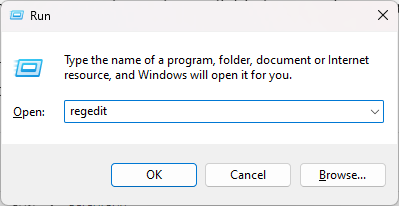
Note: Before editing the Registry, we recommend creating a backup using the Tweaking Repair software. You can do so by clicking the Backup Tools tab and the Backup button from the Registry Backup section.
- Press the Win + R keys, type regedit, and hit Enter to open the Registry Editor.
- Navigate to the following key:
HKEY_LOCAL_MACHINE\SOFTWARE\Microsoft\Windows NT\CurrentVersion\ProfileList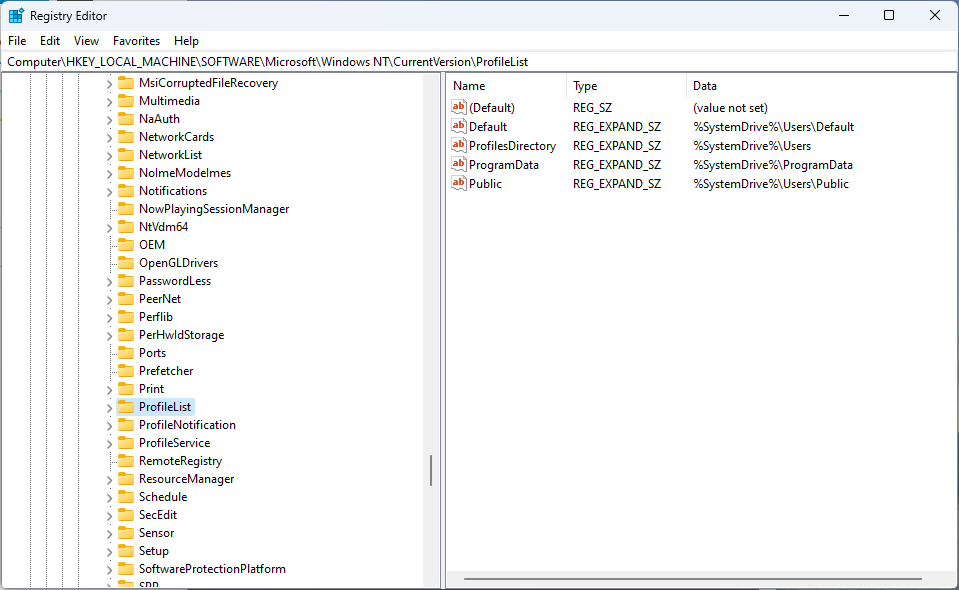
- Check if any entries have a .bak value attached.
- Back up the registry key and delete the entry with the extra .bak value.
- Restart your PC.
3. Fix error 1053
Similar issues with the Microsoft Software Shadow Copy Provider Service (SwPrv) have been reported with VSS on XP PCs.
Using the commands net start vss and net start SwPrv in the Command Prompt, you should be able to start and stop both VSS and SwPrv manually.
If that is not the case and you receive an error when trying to start SwPrV, it is most likely an issue caused by permissions or a possible registry error.
Here are some possible solutions for Windows XP:
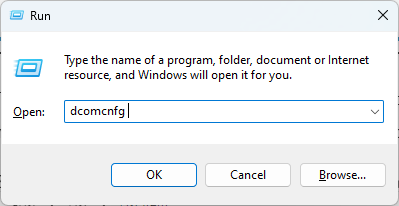
- Click Start, and choose Run. Type dcomcnfg and press Enter to run it.
- Navigate to the following path:
Component Services > Computers > My Computer
Right-click My Computer and choose Properties.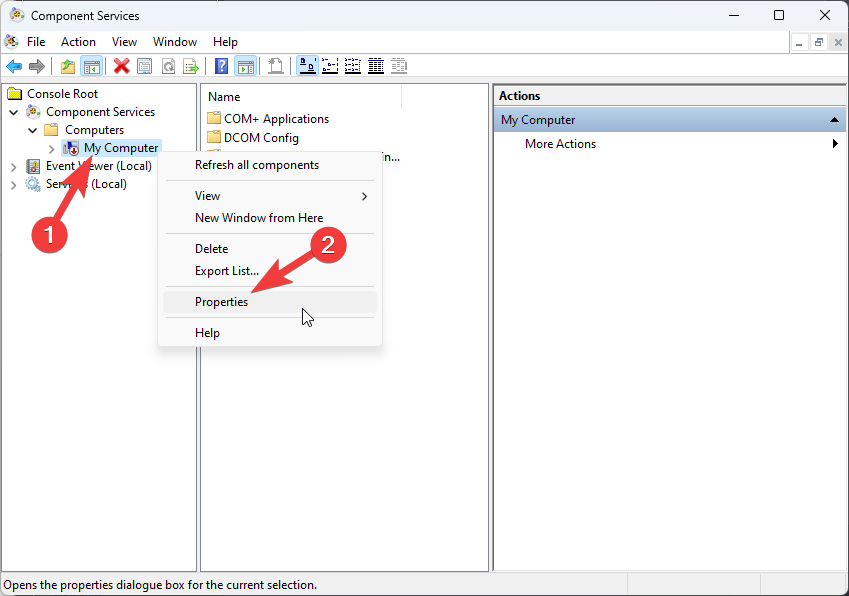
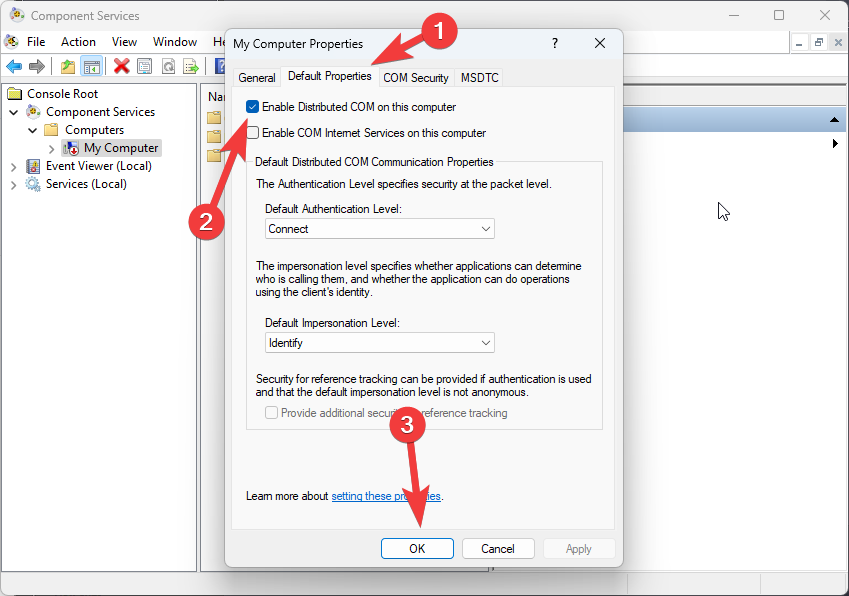
- Open the Default Properties tab, and ensure that the Enable Distributed COM on this computer option is enabled. If not, enable it and click OK.
- Navigate to the COM Security tab, and click Edit Default in the Launch and Activation Permissions section.
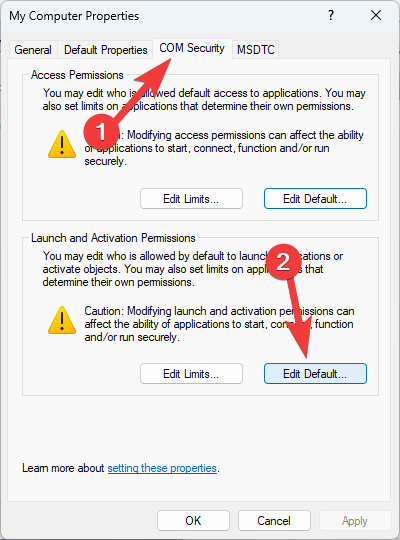
- Make sure that the following accounts have the required permission level:
– Administrators: Full Control
– System: Full Control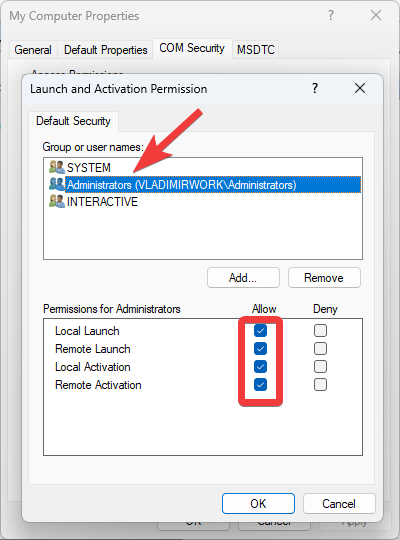
- Click OK to save the changes, and restart your PC.
4. Fix the no VSS writers listed when running the vssadmin list writers command on Windows Server 2008
- Click Start, type regedit in the search box, and press Enter.
- Navigate to the following registry key:
HKEY_LOCAL_MACHINE\SOFTWARE\Microsoft\EventSystem\{26c409cc-ae86-11d1-b616-00805fc79216}\EventClasses\{FAF53CC4-BD73-4E36-83F1-2B23F46E513E}-{00000000-0000-0000-0000-000000000000}-{00000000-0000-0000-0000-000000000000}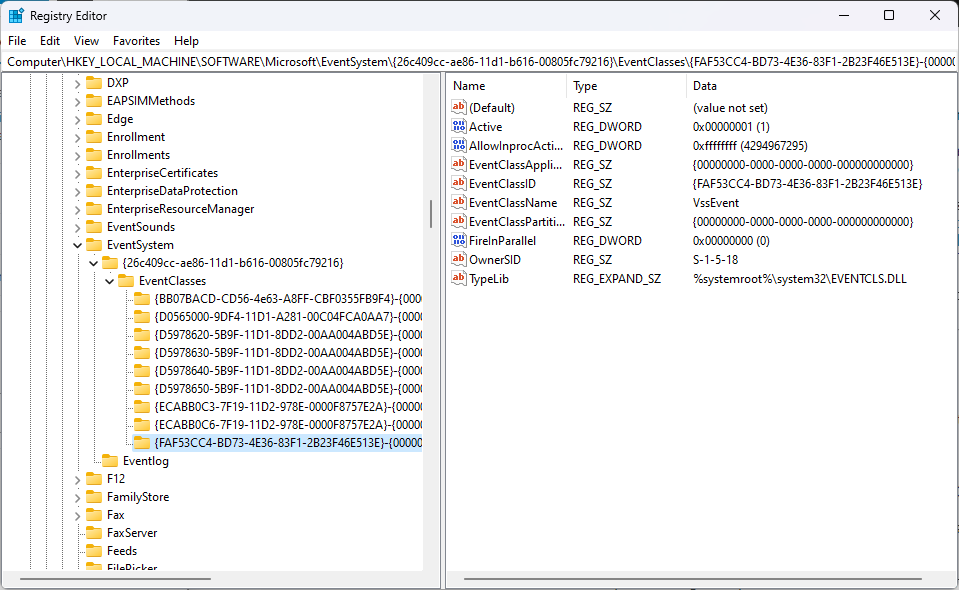
- Find the TypeLib registry value (should appear as REG_EXPAND_SZ).
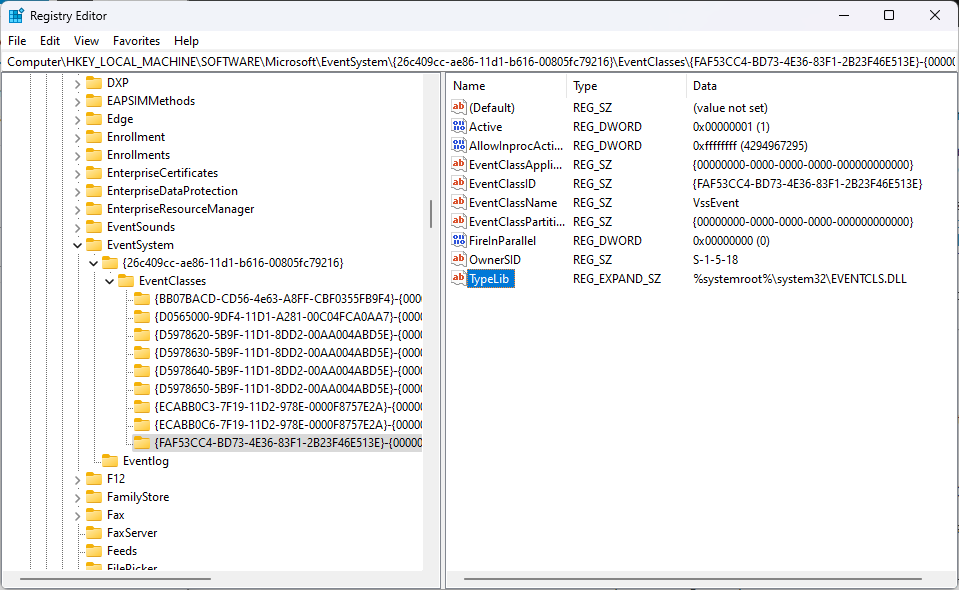
- Double-click the respective registry value, type the following text inside the Value Data box, and click OK:
%systemroot%\system32\EVENTCLS.DLL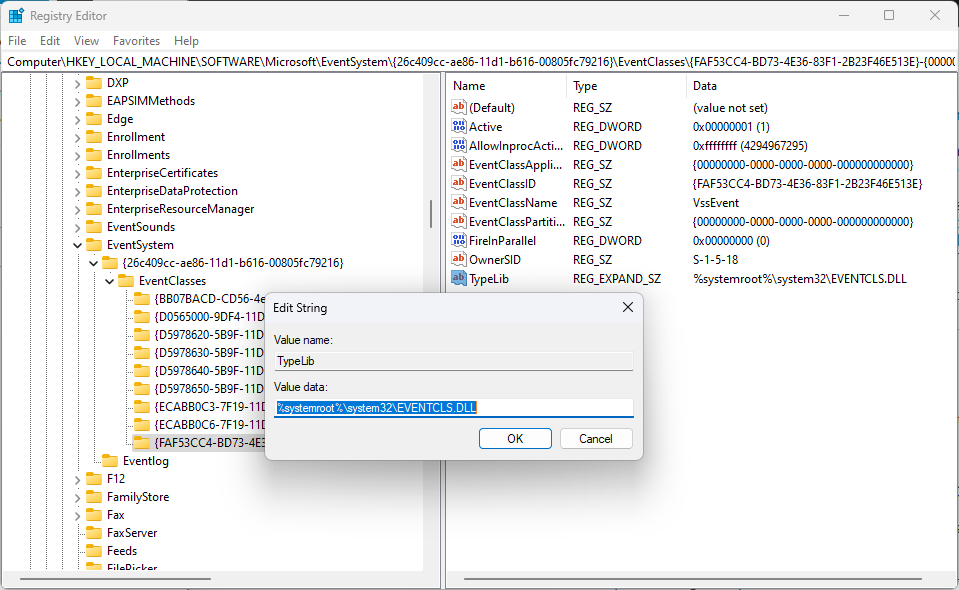
- Close the Registry Editor, click Start, type services.msc, and hit Enter.

- Right-click each of the following services, and click Restart:
– COM+ Event System
– Volume Shadow Copy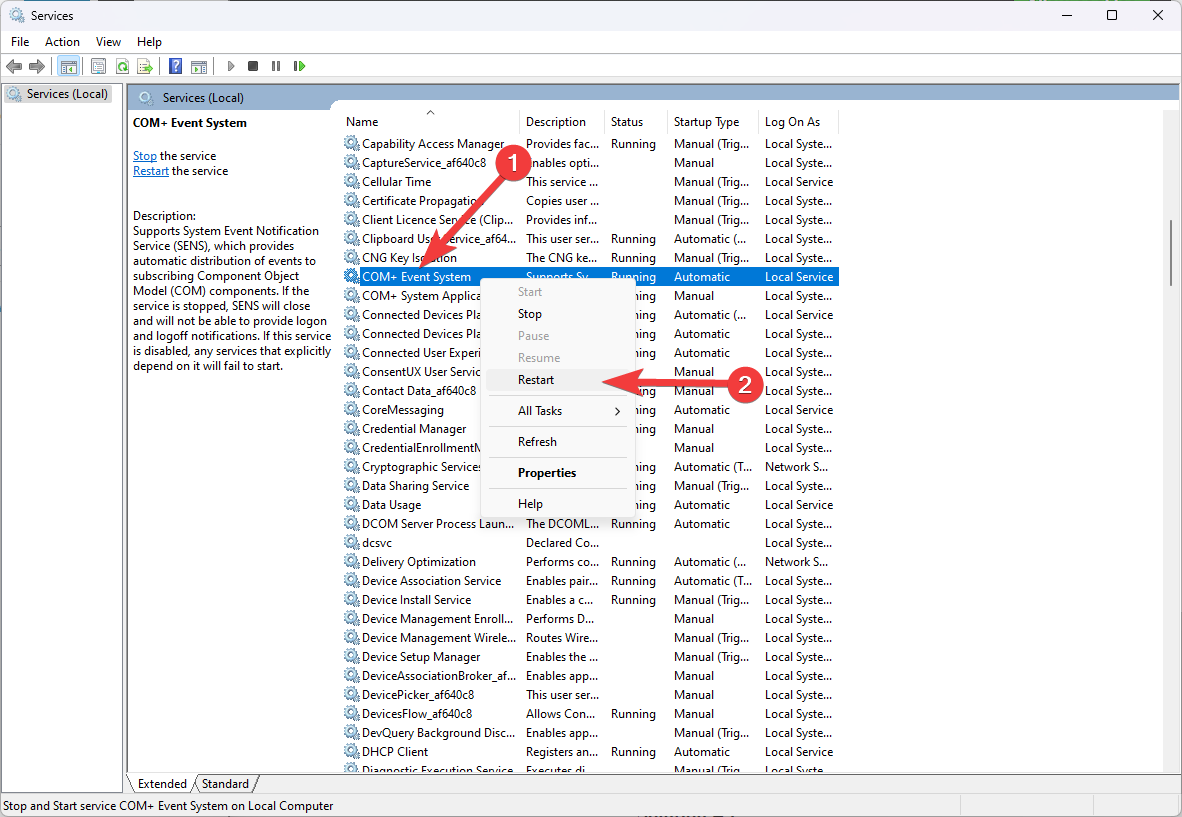
- Close the Services window, and open Command Prompt with administrator privileges.
- Type the following command and hit Enter to run it:
vssadmin list writers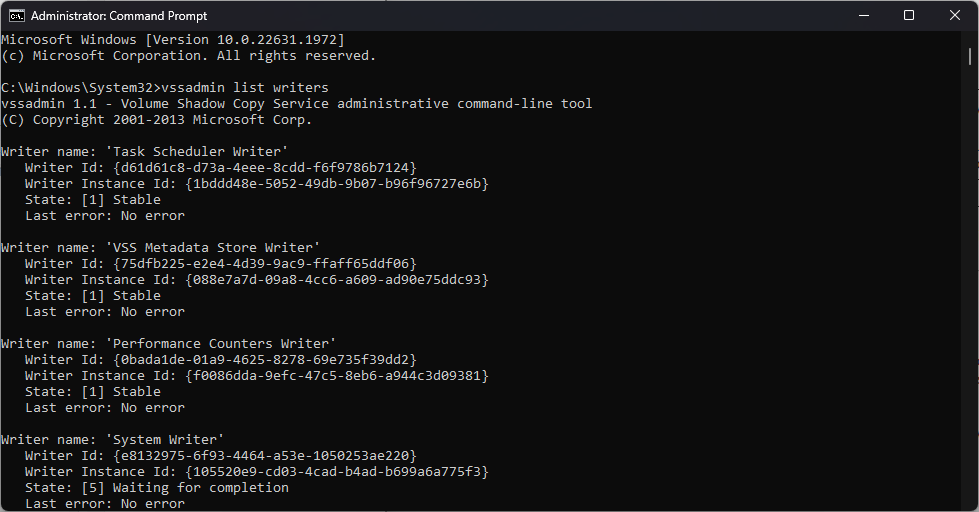
- Check if the VSS writers are now listed.
5. Fix corrupted COM+ subscription information
This VSS repair strategy seems efficient when the System Writer reports an error. Inside the Event Viewer, these errors can look like this:
Writer Class Id: {e8132975-6f93-4464-a53e-1050253ae220}
Writer Name: System Writer
Writer Instance ID: {34162f4c-59ff-468e-848d-cb4b3d8dd7dc}
- Open the Registry Editor by typing regedit in the Run window and pressing Enter.
- Navigate to the following path inside the Registry:
HKLM\Software\Microsoft\EventSystem\{26c409cc-ae86-11d1-b616-00805fc79216} - Delete the Subscriptions key and restart your PC.
- Open Command Prompt with admin and try the following command, which should now work without issues:
vssadmin list writers
6. Use the Command line
- Run Command Prompt with admin rights.
- Type the following command to clean up any dead VSS snapshots:
vssadmin delete shadows /all - Run the following command to check for any errors:
vssadmin list writers
If you receive an error for a VSS writer, you might need to fix that item. - Open the Run dialog, type services.msc, and press Enter to run it.
- Search for, and restart the following services by right-clicking them and choosing Restart:
– COM+ System Application Service
– Distributed Transaction Coordinator Service
– Volume Shadow Copy Service
– The affected VSS writer service that had an error (e.g., Virtual Server 2005 VSS writer or Hyper-V VSS writer)
Note: It is always recommended to check for any additional error information logged in by the respective damaged VSS writer inside the Event Viewer.
7. Check for VSS writers with errors from other backup software manufacturers
We have seen VSS writers of other backup software manufacturers cause system instability and errors.
To resolve this issue, open the Registry Editor (regedit) as administrator and check the following path:
HKEY_LOCAL_MACHINE\SYSTEM\CurrentControlSet\services\VSS\Providers
Underneath that key, you should only find Microsoft Software Shadow Copy Provider 1.0 and no other VSS writer. If you do find another, it may be a residue registry entry of a previous backup software installation.
You can save the entry by exporting the entire registry to a file (right-click and select Export), and then it’s safe to delete the entire branch entry underneath the following key:
HKEY_LOCAL_MACHINE\SYSTEM\CurrentControlSet\services\VSS\Provider
Then reboot and try rerunning vssadmin list writers to confirm the problem has been resolved.
8. Fix the vssadmin delete shadows command not available
On some systems, the command vssadmin delete shadows isn’t available. In Windows XP, that’s okay because VSS snapshots can’t be persistent on XP (a reboot will get rid of them); however, on Vista, you need to delete old shadows using the following command:
vssadmin Resize ShadowStorage /For=C: /On=C: /MaxSize=300MB
300MB is usually the smallest amount you can specify and will effectively delete any existing VSS snapshots on your system.
If you don’t get any VSS writer errors when using vssadmin list writers, but the system can’t create a new VSS snapshot (and you have deleted all existing images). You may have to increase the max shadow storage size on your system. Use the previous command with a more significant number, such as 10GB:
vssadmin Resize ShadowStorage /For=C: /On=C: /MaxSize=10GB
Note that it is also possible to allocate shadow copy storage space on a different drive, as long as it’s local:
vssadmin Resize ShadowStorage /For=C: /On=X: /MaxSize=200GB
9. Fix the VSS error code 0x800423f3
If the VSS error code 0x800423f3 is reported, the reason is a corrupt state of WMI (wmiutils.dll). This may happen if a registry cleaner was used or a third-party application was uninstalled incorrectly. You need to re-register wmiutils.dll and then restart the WMI service.
In the command prompt, execute the following three lines (note that stopping the WMI service does NOT stop VMs, it only stops the management service):
net stop winmgmt
regsvr32 wmiutils.dll
net start winmgmt
Tweaking.com – Registry Backup Videos
- How to use the program
- How To Use Restore From The Windows XP Recovery Console
- How To Use Restore From The Windows Vista & 7 Repair Options
- How To Use Restore By Using A Live CD
The registry backup capabilities of Tweaking are a crucial tool that can help users maintain the health and stability of their Windows operating system.
By creating regular backups of the Registry, users may ensure that they always have a restoration point available in case of a system failure or data loss.
Users can also save time and disk space by scheduling backups and incremental backups to ensure security.

Vladimir Popescu
Verified at:
07/03/2023 10:31
Vladimir started writing articles about Windows because he has a natural interest in this topic, and he has been an avid professional user with more than 15 years of experience. He’s also been writing for WindowsReport.com, MSPoweruser.com and present in various other online publications on matters related to Windows and Windows servers.
Vladimir enjoys practicing Crossfit and making art when he’s not creating top articles with in-depth information.
Leave a Reply