
Are you asking yourself – why is my Snipping Tool not working? Capturing, editing, and saving screenshots on Windows without using third-party tools is made possible by the Snipping Tool. This lightweight native app is an essential feature of Windows, but it may also encounter issues and malfunction at times.
Even after upgrading to Windows 10/11, the Snipping tool still has strange issues. You might encounter error messages, blank or black screens, images failing to save, or the app not working. If you’re experiencing any of these problems with the Snipping Tool, I will guide you through several methods that may help you resolve these issues.
Why is my Snipping Tool not working?
Issues or bugs may cause the Snipping Tool to disappear or fail to launch. However, I’ll highlight the main reasons why the Snipping Tool doesn’t work:
- Outdated Windows OS
- Corrupted system files
- Conflict with third-party capturing tools
- Shortcut key conflicts or misconfiguration
- Computer’s date and time issue
- Outdated or corrupt display driver
- Focus assist is enabled.
I note here that Snip and Sketch was introduced in the Windows 10 October 2018 update and is intended to replace the Snipping tool. Your Windows may be transitioning to Snip & Sketch, which could impact the Snipping Tool.
How do I fix it if my Snipping Tool is not working?
If your Snipping Tool is not working, I suggest the following methods to fix this issue:
- Relaunch Snipping Tool
- Update Windows OS
- Update graphics driver
- Repair or reset the Snipping Tool
- Fix your computer’s date/time
- Repair system files
- Uninstall third-party screen recording or capturing tools
- Turn off Focus assist
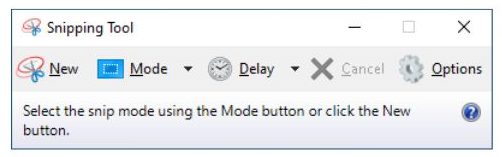
1. Relaunch Snipping Tool
If you are facing any issues with the Snipping Tool, the first step I suggest taking is to quit the application and restart it. You can use the Windows Task Manager to end the Snipping Tool completely and then relaunch it to see if the issue has been resolved. Do the following:
1. Press the Ctrl+Shift+Esc keys simultaneously to open Task Manager.
2. Right-click the Snipping Tool under the Processes tab, then select End task.
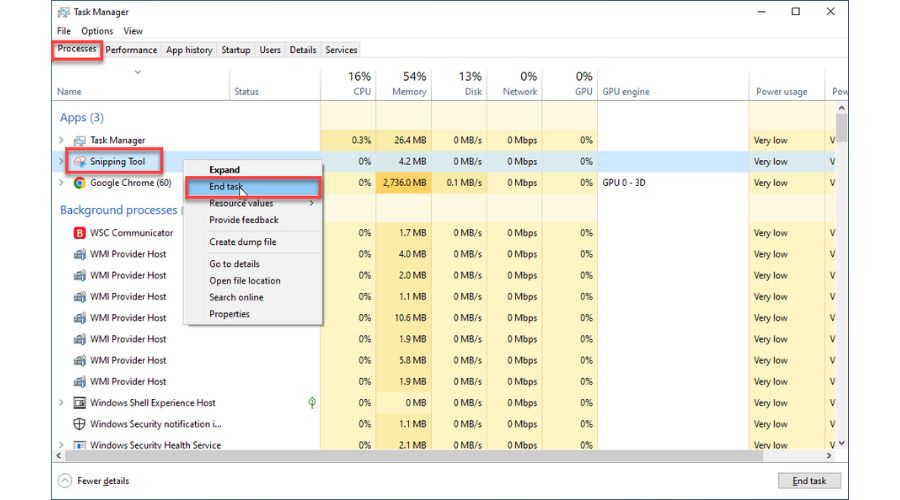
3. Type snipping tool in the Search bar and click on the Snipping Tool in the search result.
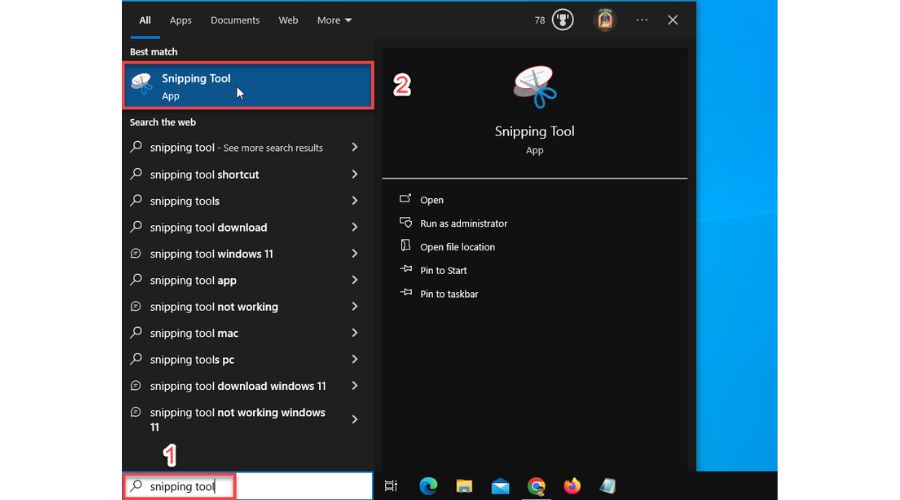
4. Check if the Snipping Tool is working without any issues.
Another method I advise here is to restart your computer and try to see if the Snipping Tool will work. If that option doesn’t solve the problem, go to step 2.
2. Update Windows OS
It is important to keep your Windows up-to-date by regularly installing updates. These updates fix bugs, add new features, and provide security patches, which can significantly enhance your Windows experience. If you haven’t updated your Windows version yet, I highly recommend doing so ASAP.
Updating your Windows will provide the latest bug fixes for Microsoft apps, such as the Snipping Tool. Follow these steps to check for updates:
1. Type ‘update‘ in the Search bar, and click on the Check for updates in the search result.
2. Windows Update will automatically start scanning your system, and all you have to do is wait until your system is updated to the latest version.
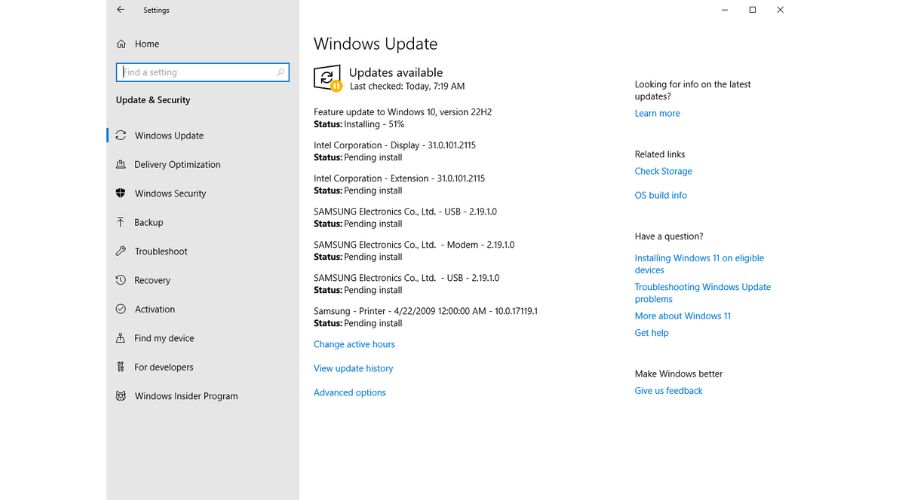
3. If the automatic update does not start immediately, click the Check for Updates button to force a check for the availability of new updates.
When the system is updated, check if the Snipping Tool works without problems. Otherwise, move on to my next tip.
3. Update graphics driver
In addition to updating Windows OS, if your graphics driver is outdated, your computer’s graphics may not be able to process images properly, leading to issues with the Snipping Tool. Therefore, I recommend updating your graphics driver to see if it resolves the problem.
You can update your graphics driver by visiting the manufacturer’s website (such as NVIDIA, AMD, or Intel) or through Device Manager:
1. Right-click on Windows Start and choose Device Manager.
2. Double-click on the Display adapters to expand the category.
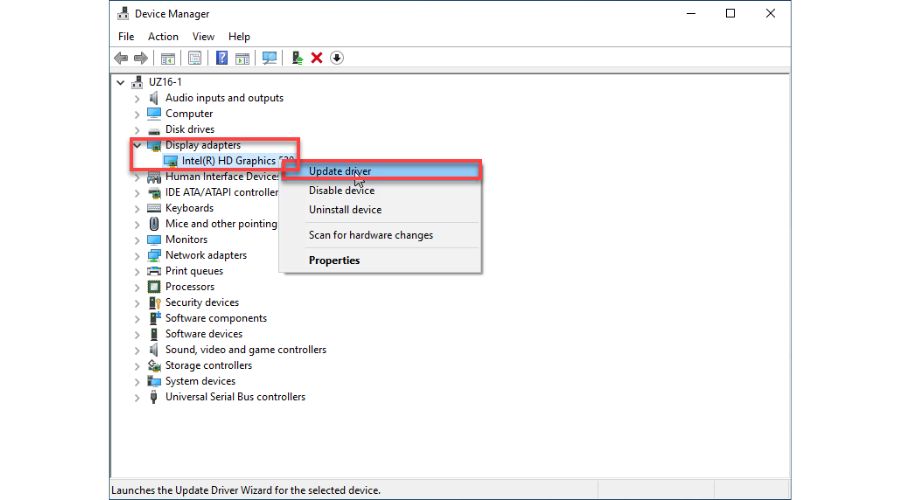
3. Right-click on your graphics card and select Update driver.
4. Click on the ‘Search automatically for drivers‘ and follow the on-screen guide to finish the update.
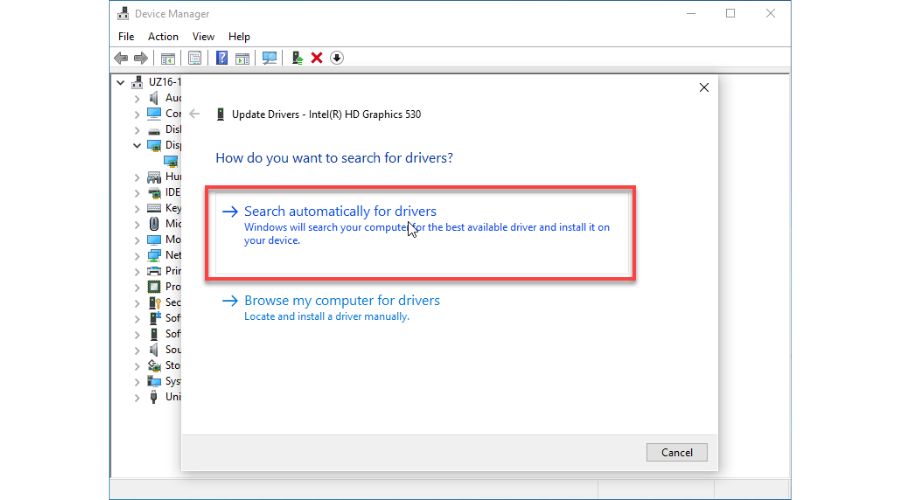
5. Reboot your PC and check if the Snipping Tool is working.
4. Repair or reset the Snipping Tool
If you encounter issues with an app that prevent it from functioning correctly or certain features fail to work as intended, you can try to repair and reset the app using the built-in process called Apps & Features. Let me explain how you can do this if you’re having problems with the Snipping Tool:
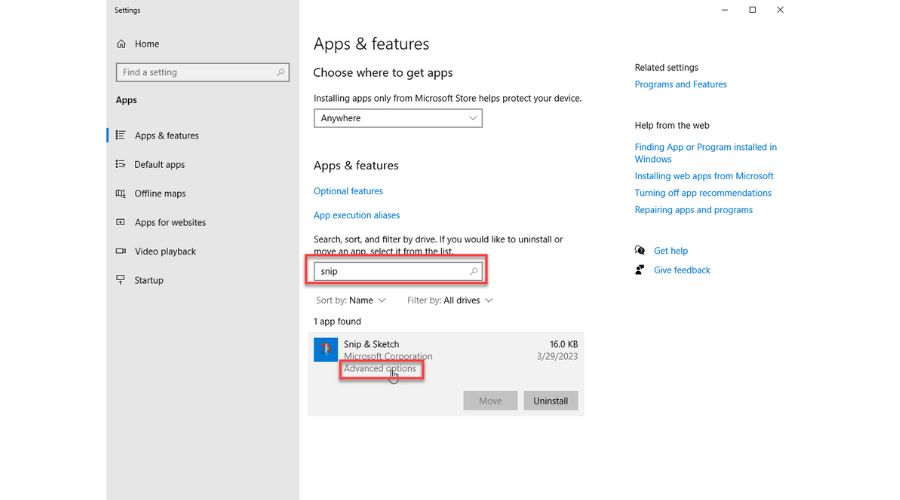
1. Type ‘apps & features‘ in the Search bar, and click on the Apps & features in the search result.
2. Scroll down to find Snippet Tool or search from the list and select Advanced options.
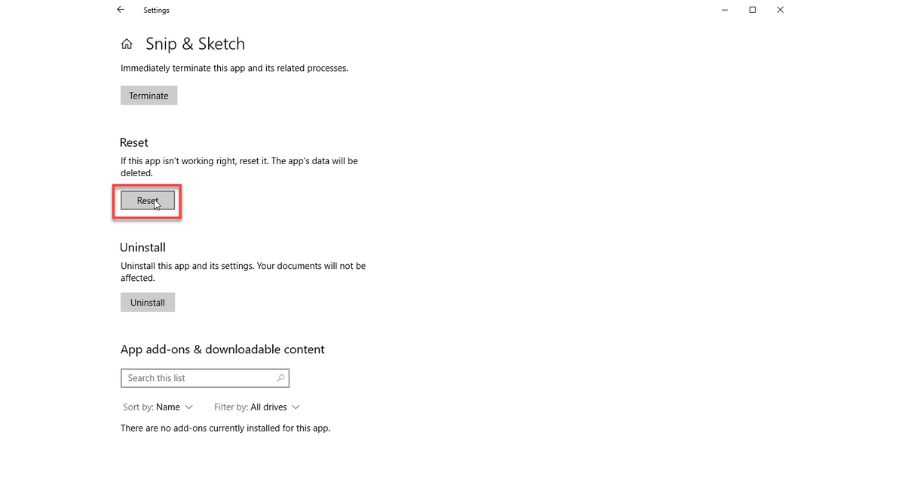
3. Click on the Reset button.
5. Fix your computer’s date/time
It’s important to keep your computer’s clock accurate as it can cause unexpected problems if it’s incorrect. This is because many apps and features depend on security certificates that are only valid for a limited time, after which they must be renewed.
When your computer’s time and date differ from the Internet, it can cause issues with apps like the Snipping Tool. To avoid this, I recommend correcting your time/date and synchronizing with the Internet time. Follow my steps:
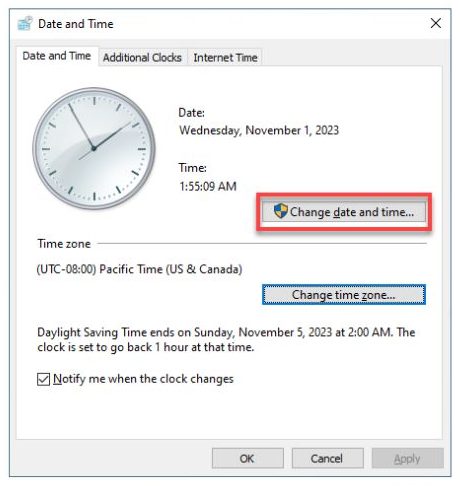
1. Press the Windows+R keys to show the Run dialog box.
2. Type timedate.cpl and hit Enter to open the Date and Time settings.
3. Make sure your computer’s time and date are correct. If not, click Change date and time to adjust.
4. Select the Internet Time tab, and choose Change settings.

5. Click the Update now button to ensure your time is synced with Internet Time.
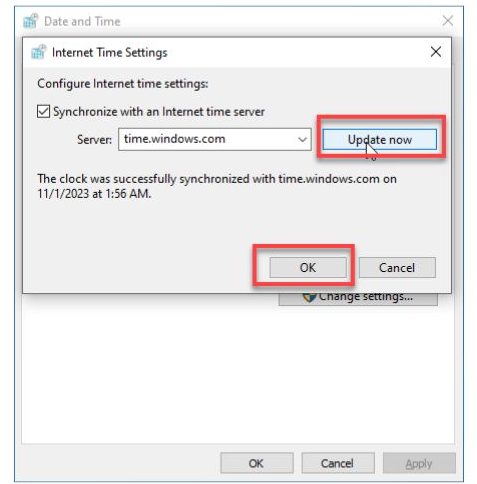
6. Confirm changes on OK and start the Snipping Tool to check if the issue is gone.
6. Repair system files
If you’re experiencing issues with the Snipping Tool, it could be due to corrupted or damaged system files on your computer. One possible solution is to run a system scan to detect any broken system files.
You can use the Windows built-in SFC tool for this, but it may not be effective in finding all corrupted files. Alternatively, I recommend using third-party tools that specialize in Windows repair for a more comprehensive solution.
1. In the Run dialog box, type; cmd and press Shift+Ctrl+Enter to run Command Prompt as administrator.
2. Type; sfc /scannow and press Enter.
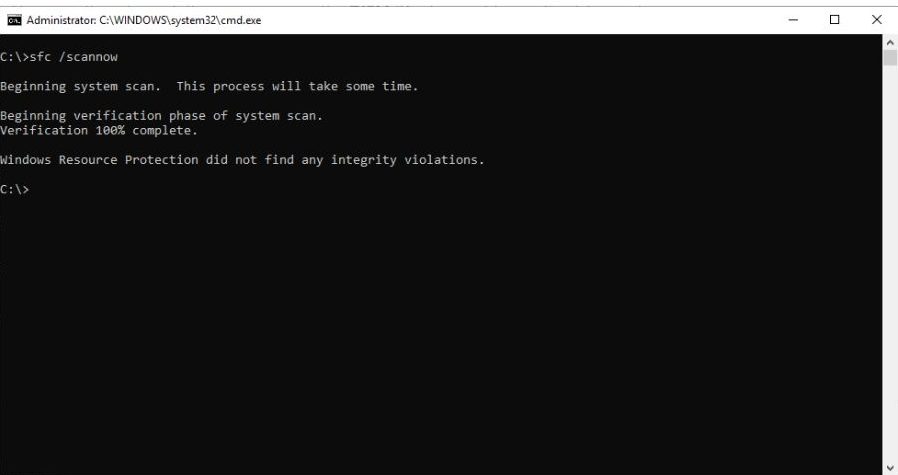
3. After SFC scans and repairs system files, restart your computer and check if the Snipping Tool works properly.
7. Uninstall third-party screen recording or capturing tools
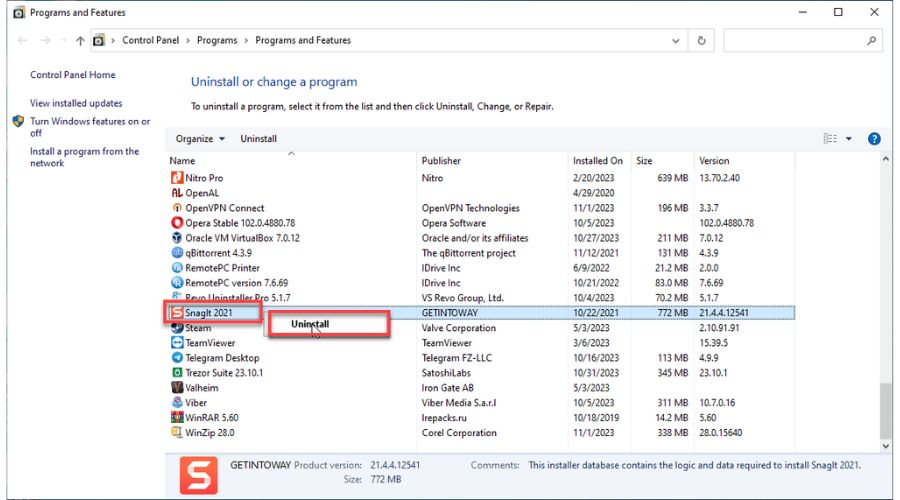
I want to note that the Snipping Tool may experience interference from other software, which could cause problems with your keyboard shortcuts. If you’re having trouble with the Snipping Tool, you could try creating a new shortcut or changing the shortcut keys.
To avoid conflicts, especially with screenshots or recording tools like Lightshot, Snagit, etc., I recommend uninstalling third-party software and using the Snipping Tool exclusively.
8. Turn off Focus assist
If you often get distracted while working on your computer, you might have used an app called Focus Assist. It helps to eliminate unnecessary notifications and pop-ups that can hinder your productivity. However, it may also block some useful apps, including the Snipping Tool. To avoid such inconvenience, I recommend turning off the Focus Assist app. Do the following:
1. Type focus in the Search bar, and click Focus assist in the search result.
2. Under the ‘Focus assist‘ section, click the radio button to turn Off this option.
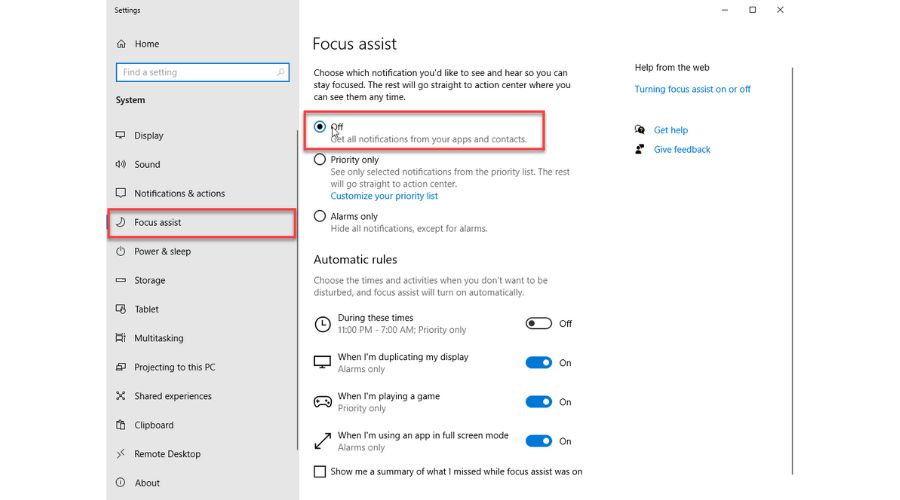
3. Now, check if the Snipping tool is working without issues.
Summary
The Snipping Tool is a reliable feature in Windows, but on rare occasions, it may malfunction or fail to launch due to various issues or bugs. In this article, I have outlined eight methods that you can use to troubleshoot potential problems with the Snipping Tool. If you have any further questions or a different solution to the problem, feel free to leave a comment below.

Vladimir Popescu
Verified at:
07/03/2023 10:31
Vladimir started writing articles about Windows because he has a natural interest in this topic, and he has been an avid professional user with more than 15 years of experience. He’s also been writing for WindowsReport.com, MSPoweruser.com and present in various other online publications on matters related to Windows and Windows servers.
Vladimir enjoys practicing Crossfit and making art when he’s not creating top articles with in-depth information.
Leave a Reply